baking

Baking With Sourdough Is Nearly Foolproof

The tacit promise of sourdough, and of your commitment to maintaining a starter and baking a loaf, is that you nearly always get bread. Most cooks have known an underbaked cake, overcooked vegetables, or dishes that are over spiced, over salted, or altogether ruined. Sourdough is a world apart; no matter the slip up, you will have bread on your table.

Consider overproofing. If your dough stays too long on the countertop before you transfer it to the refrigerator, it becomes gassy and fragile and will collapse when you move it from bowl or brotform to pot. The dough will be a trick to handle, but it will rise again, not as high and round as it would have, but it will rise in the oven and you will bake good bread.

What about the opposite, underproofing the dough? By this I mean leaving it for too little time on the countertop and ultimately baking it before it has fully risen. In this case, there will not be as many gas bubbles as you need to help the dough fully expand, which will make the finished loaf smaller and denser than it would otherwise be. The loaf may also be underbaked because heat more slowly permeates an underproofed loaf. Still, your bread will be fine.

How about forgetting to salt your dough? Here it helps to understand that the role of salt in bread baking is to slow fermentation. So if you forget to add salt, which someday you will, your dough will rise round and high more quickly than usual and you may initially feel pleased with yourself. In the refrigerator, the dough will rise almost beyond the limits of the brotform or bowl, and you may start to feel queasy; what you are seeing is the yeast taking their usual ride, but without any brakes on.

In the end you will bake your dough, perhaps still unaware of your error, but then you will taste the bread and you will know. You will faintly remember forgetting to add salt. You will, of course, have bread, but it will not be bread with any flavor and you cannot salt bread after the fact. Not even a layer of salted butter will disguise this error. The best path forward for an unsalted loaf is to make bread crumbs that you can toast and salt and use to embellish all sorts of dishes. In a way, this counts as having bread.

What if you forget to score the loaf before baking? When you first put dough in the oven, rapid gas production pushes the dough up and out in a final rising burst before the crust hardens. Scoring controls the direction of the rise and prevents the surface of the dough from tearing open. If you forget to score the loaf, your bread will not rise as round or high as it would have and it will tear, making it less beautiful, but you will undeniably get flavorful bread.

What if your starter dies and, without realizing it, you make a dough using DEAD STARTER? This happened to me when I was a young baker never imagining the demise of my starter. So I went on baking, more than once, with starter than had perished or nearly so. The loaves I baked were small and dense. There were large holes throughout the crumb as if greedy moths had taken up residence, yet I did get bread, which in my ignorance I served and nothing bad happened.

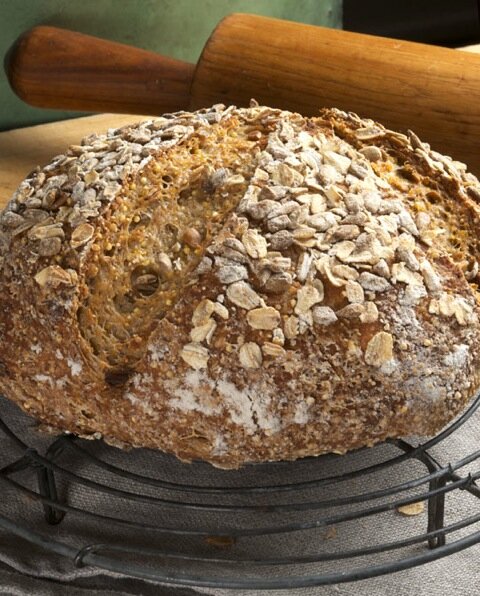
All this is to prove what an ally sourdough is, helping to put food on the table through every imaginable distraction and misstep. Honoring the intersection of talent and luck, sourdough reminds us that we are not less worthy when our efforts take a turn any more than we are masterful when in the sun-bright bliss of morning we turn out a golden loaf: glossy and well risen, flawlessly scored, and baked to precision.

Copyright, Ellen Arian, Ellen’s Food & Soul

5 Ways to Develop Your Sourdough Bread Baking Skills

1. View salt and water as tools that can help you bake a better loaf.

When you make sourdough bread, it helps to think of salt and water as more than ingredients. They are also tools you can use to bake better bread.

Starting with salt, each time you mix ingredients for dough, you have two decisions to make: how much salt to add and when to add it. Your aim is to find the balance that will give you optimal flavor, texture, and rise. In making these decisions, it helps to understand salt’s basic qualities:

Slows fermentation. Put another way, salt inhibits the rise of your loaf. If you’re making dough in a warm summer kitchen, you may want to add salt to the dough and knead it within 20 minutes after the initial mix of ingredients; this will help you avoid too quick a rise and overproofing the dough. If, on the other hand, you’re making dough in a drafty winter kitchen, wait up to an hour after the initial mix to add the salt. Adjusting the timing of kneading salt into your dough will ensure an optimal rise.

Contributes to crust color. This is because, as mentioned above, salt slows fermentation. The easy way to understand this is that wild yeast consume sugar as your bread dough rises. Since salt slows fermentation, it also slows the rate of sugar consumption, leaving more sugar available at baking time for coloring the crust. Without enough salt, the yeast consume all the sugar before baking, resulting in a crust that’s pale and dull.

Adds strength to bread dough and tightens the gluten structure. What this means, technically speaking, is that salt helps your dough hold on to the carbon dioxide that’s released during fermentation. What it does, in simple terms and if you don’t use too much, is to promote an open, airy crumb.

Is an antioxidant. By preserving carotene pigments and flavors in your dough, salt helps maintain the nutritional value of flour. Note that one reason for not waiting longer than an hour to knead salt into dough is that the flour may become overoxidized and decline in quality, contributing to a loss of both flavor and color.

Holds on to water. A well-salted loaf of bread tends to remain moist even in the dry heat of a winter kitchen. In summer’s humidity, however, the same loaf may develop a soggy crust in storage. You can use this information to gently tweak the volume of salt and control the moistness in your loaf.


There are also the specifics of water to consider. Water is the one ingredient that best ensures a loaf of bread with ideal volume, memorable flavor, and a beautifully-textured crumb. A telltale sign, for example, of a dough that’s too dry is its tight, cottony crumb.

With the students I teach, their most common misstep is failing to add enough water to their bread dough. One reason water is so important is that it helps activate gluten, and it’s the network of gluten strands that forms the structure of dough.

It will take some experimentation on your part to get the volume of water right, and if your bread quality is less than ideal, adjusting the water may be the best place to start. You will know you’ve added too much water if your dough is wobbly and hard to handle, ferments too fast, or has a gummy texture after baking, which can happen when too much water leaves the gluten proteins “swimming,” making it hard for them to link up.

Also keep in mind that whole-wheat and rye flours absorb more water than white flour does, so as a baseline you need to add more when mixing a whole-grain dough.

2. Over time, practice making dough by touch.

Knowing how much water to add to your dough becomes easier if you learn to bake by touch. I developed this skill when I began baking with flour freshly-milled from “landrace” wheat. This term refers to flour ground from local wheat that was allowed to develop over time and adapt to its environment. The implication for me, and why it became a problem, was that no two batches of flour were ever the same.

After baking many mediocre loaves and ultimately giving up on this flour, I decided to try again. Since I knew the problem was that each batch of flour absorbed water differently, my solution was to stop relying on a precise measure of water.

Through trial and error, I came to learn that my bread is best when the dough is tacky but not sticky, and this is how I know I have the measure of water right. I still measure flour to the gram, but I add water by feel. It didn’t take long to master this approach, one that made baking easier and improved my level of skill. I can now bake with all sorts of flours in all sorts of seasons and kitchens and still get the same ideal result.

3. Use starter that is at its peak and full of gas.

Sourdough starter is an ecosystem of yeast and bacteria that live together in a cooperative community. When combined with flour and water and exposed to oxygen — for example, when you mix and knead dough — sourdough cultures begin to break down flour and produce carbon dioxide; the speed at which they work determines how fast your dough will rise. This process is what we refer to as fermentation or proofing.

For an optimal rise, you should make your dough with starter that has lots of bubbles on its surface and is full of gas. In practical terms, this is the point in its development when the starter has risen and not yet fallen back onto itself. Once it collapses, starter becomes more acidic and less able to leaven your dough. If this happens, feed it one more time, remembering how forgiving your community of microbes is likely to be.

How much does it matter if you use starter that’s at its peak? You have room to maneuver here, but it’s an ideal worth considering because when your starter is not fully ripe, your dough will not rise as round or high. You will still get good bread, but it won’t be as light and airy as it might otherwise have been.

4. Use the freshest flour available to you.

I hesitate to mention flour quality because flour is not free and none of us should feel that our efforts are not good enough. On the other hand, flour choice does impact the flavor and healthfulness of your bread, so tuck this information away in your mental library and use it to develop your bread baking over time.

One consideration with flour, especially whole-grain flour, is that it breaks down quickly and can go rancid, often before it reaches the store shelves from which you buy it. Another is that unless it is organic, wheat is usually sprayed with the herbicide Roundup before harvest. It is also typically harvested green, meaning before the wheat is ripe and its nutrients are fully developed. Taken together, these practices have established a new industrial ideal, one it helps to be aware of.

There are ways, over time, that you can work around these considerations. For example, you can purchase wheat berries and grind flour yourself; in this case, a home mill could be a good solution. Alternatively, you can find local sources of freshly-milled flour. Or you can purchase flour milled from organic grain, and seek out specialty growers who share your ideals.

We all have constraints that may limit our options. Still, the guarantors of freshness and quality are worth understanding and may have some role to play in your own internal conversations about the baking of bread.

5. Pay attention to the lessons that each loaf will teach you.

Learning to read a loaf of bread and understand what it can teach you is as interesting as it is fun. It happens that almost nothing is a mistake. It’s just the way the bread turned out this time and this is information you can learn from.

Here are some examples:

  • If the scoring of your finished loaf fans out in cracks at each end, this means you could have proofed the dough longer or scored it more deeply.

  • If the crust color is lackluster, this tells you the dough needed more salt or less proofing time.

  • If the crumb is dense and uniform, your dough may have been underproofed. Or you may have needed more water in the initial mix of ingredients.

  • If the dough sticks to the bowl or brotform when you go to bake it and you lose some or all of the top of your loaf, this is a sad occurrence. It usually means the dough was too wet, and the effect can be compounded if you proofed the dough too long.

  • If the dough collapses onto itself when you transfer it from bowl or brotform, your dough was overproofed. When you get proofing time right, the dough will be round and high with full integrity — meaning, it will be able to stand in its roundness and highness without support as you transfer it to the oven.

Copyright, Ellen Arian, Ellen’s Food & Soul